
Project Summary
This project is a Spring Boot Application Dashboard. The backend uses Java with Lombok and Hibernate to help stream-line and prevent over-complication. The frontend uses Angular and Bootstrap. The dashboard allows a user to see their success rate and an overall more visual view of their job applications. This is my first large code-base, managing both the front/backends as well as needing to design the look in Figma. I wanted to build an Application Dashboard that would serve as a portfolio centerpiece — combining backend logic with a polished frontend interface. My goal was to create a responsive, data-driven application. The application would update as more information was added to the database. It would also look professional, clean and minimal.
Overview
Technology Used
Planning & Design
As a first step, I wanted to create a mock-up of the site in Figma. I knew that I wanted to create an Application Dashboard, but did not have an early design in mind. I looked at other dashboards, mock-ups and used these to format the total look. Having designed it from the top down, each element influenced the next one. I knew that a list of the applications was one of the main points. Hence, this section is the largest and most detailed. The charts are the most visual part of the UI (User Interface) so I wanted them front and center. They draw the eyes first which then allows the eyes to wander.
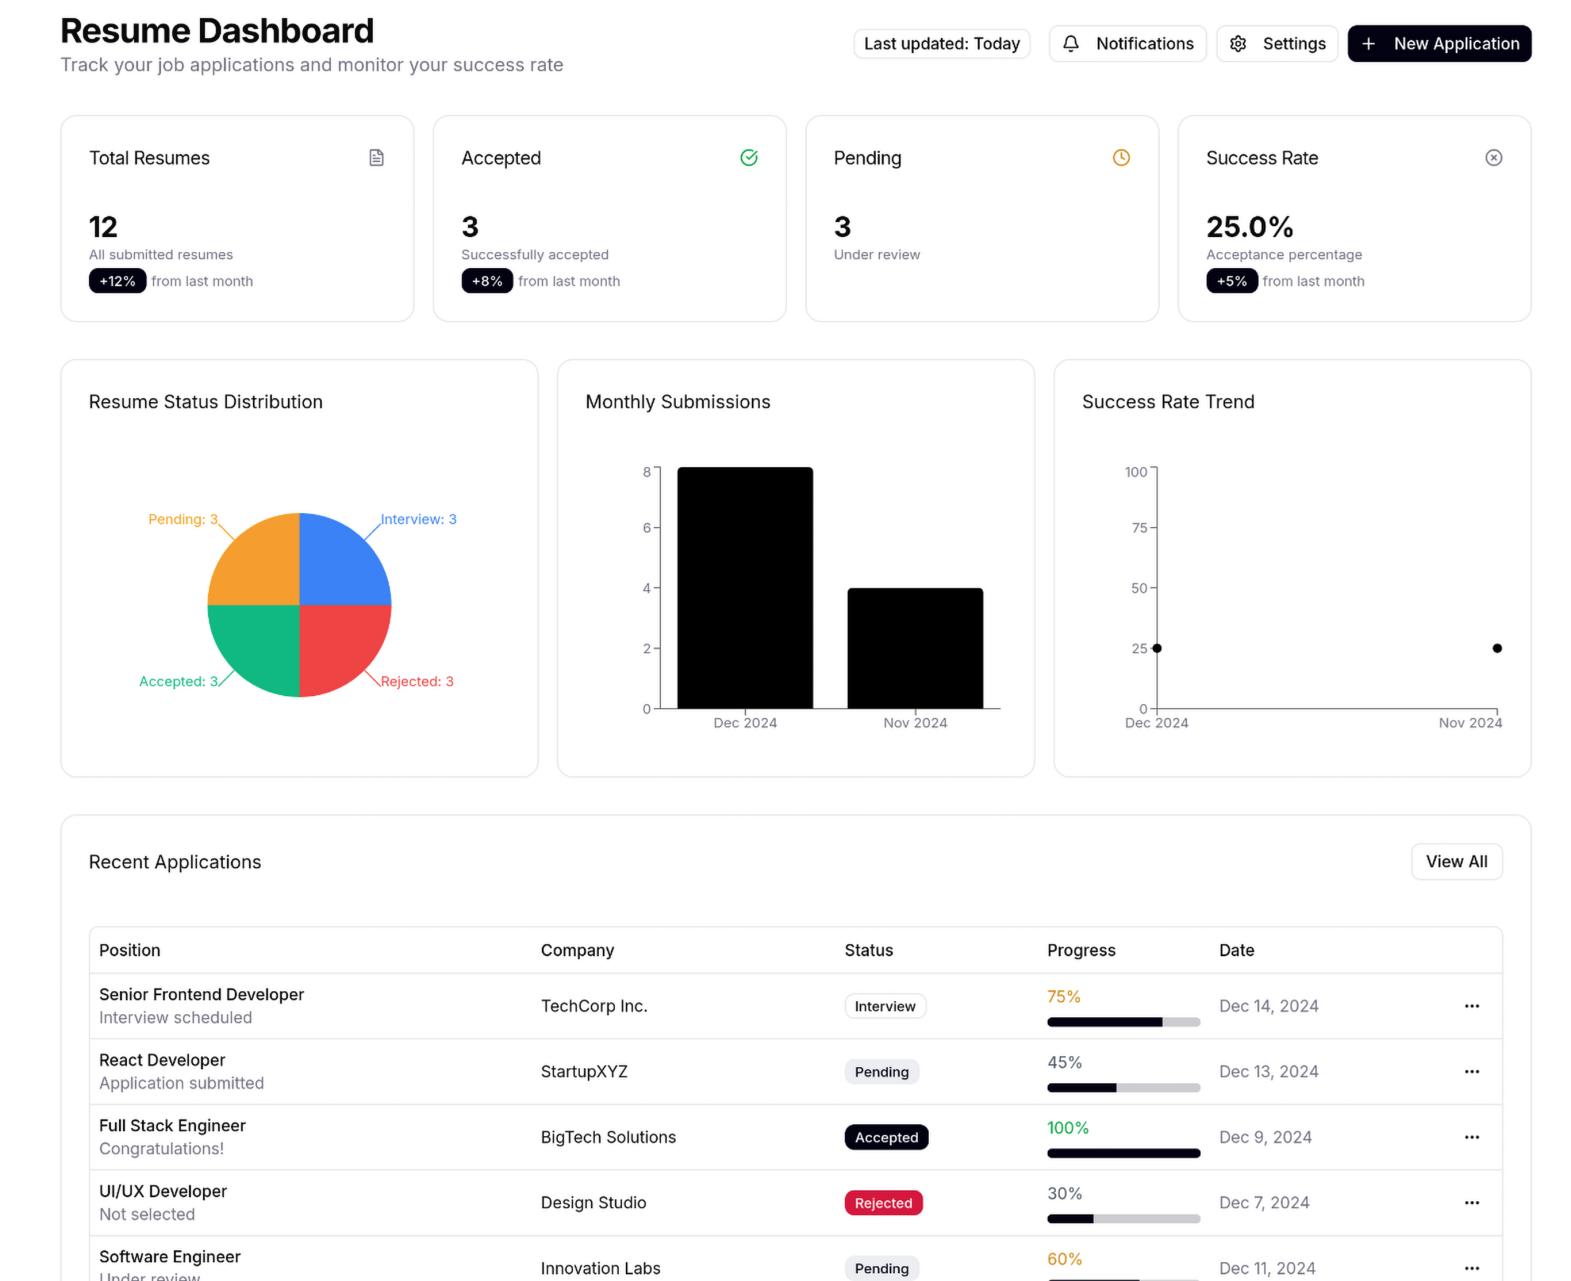

View of Figma design Left / View of final product right
Looking at the images above there are clearly a few changes between the two. Most notably is the color scheme. I kept the Red, Yellow, Green and Gray for the application list section but wanted more variety for the charts. There is also less clutter among each element. I felt that initially I had too much information per each section that made it busy. For the final product I kept what I thought was most important, dropping unnecessary information/elements. In the Figma design, I had originally wanted to show a few of the recent applications. There was a “View All” button that was intended to show all the applications. I decided to get rid of this choice in the final design and just show the whole list of applications. I feel that this eliminates an unnecessary button and allows a user to see the total applications.
Architecture & Stack Overview
Spring Boot
Spring was chosen as the main framework due to my experience with it and its ease of use. Java and Spring was the entirety of the backend logic. Any CRUD (Create, Read, Update, Delete) operations was written in Java and structured according to Spring Boot. REST APIs were also implemented within this framework. A great example of this is the backend communicating with the frontend.
Hibernate
Hibernate is used to map the Java classes to the database table. This framework helps to simplify the interactions between the two, making updates to the database.
Lombok
This library is extremely useful for eliminating boiler code and simplifying class structure. Adding simple annotations to the top of the class or functions lets the library create Getters, Setters, and Constructors. It also generates other repetitive code.
Angular
This frontend framework is the backbone of the UI. Angular allows for the creation of dynamic and scalable webpages. This is perfect for something like a dashboard view, allowing responsive updating and easy data displaying.
Bootstrap
Creating simple and easy styling updates with bootstrap is far more efficient and easy. With CSS it takes a lot more trial and error than Bootstrap. The styling is added in the HTML class and allows for instant style updates and standardized changes.
Implementation
Backend
Arguably the most important class in the backend is the Application Model. This class is used in multiple places, basically anywhere where the word application shows up, this class is used. This model uses Lombok annotations and Hibernate annotations to help create the boiler plate code:
@Entity
@Table(name = "applications")
@Getter
@Setter
@NoArgsConstructor
@AllArgsConstructor
@EntityListeners(AuditingEntityListener.class)
public class Application {
}
These annotations create a large section of the code. All that I personally needed to hard code was the class fields and map them to database table:
    @Id
    @GeneratedValue(strategy = GenerationType.IDENTITY)
    private Long id;

    @Column(name = "job_title", nullable = false)
    private String jobTitle;

    @Column(name = "company", nullable = false)
    private String company;

    @Enumerated(EnumType.STRING)
    @Column(name = "status", nullable = false)
    private ApplicationStatus status;

    @Column(name = "submission_date")
    private LocalDate submissionDate;

    @Column(name = "progress")
    private Integer progress;

    @CreatedDate
    @Column(name = "created_date",  nullable = false, updatable = false)
    private LocalDateTime createdDate;

    @LastModifiedDate
    @Column(name = "updated_date", nullable = false)
    private LocalDateTime updatedDate;
Annotations like “@Id” and “@GeneratedValue” map the id value to the primary key. This creates unique ids for each element that is created. The “@Column” annotation is what maps the individual field to the correct column in the database table.
The application class needs to have an ApplicationService class and an ApplicationServiceImpl class. These two classes give functionality to the Application model. ApplicationService is used to declare the functions that will be implemented in the ApplicationServiceImpl class. One example is:
@Override
    public void deleteApplicationById(Long id) {
        System.out.println("Delete Application with id: " + id);
        applicationRepository.deleteById(id);
    }
This class is a simple one to delete an application by id. There is a console print line for debug reasons and a simple call to deleteById(id) is called. It is that simple. Only updating an application involves more than a line or two of code:
@Override
    public Application updateApplication(Application application, Long id) {
        Application existing = applicationRepository.findById(id)
                .orElseThrow(() -> new jakarta.persistence.EntityNotFoundException("Application not found: " + id));

        if (Objects.nonNull(application.getJobTitle())) {
            existing.setJobTitle(application.getJobTitle());
        }
        if (Objects.nonNull(application.getCompany())) {
            existing.setCompany(application.getCompany());
        }
        if (Objects.nonNull(application.getStatus())) {
            existing.setStatus(application.getStatus());
        }
        if (Objects.nonNull(application.getSubmissionDate())) {
            existing.setSubmissionDate(application.getSubmissionDate());
        }
        if (Objects.nonNull(application.getProgress())) {
            existing.setProgress(application.getProgress());
        }

        return applicationRepository.save(existing);
    }
Here the updating of an application is clearly more complicated. First a check to make sure that the application actually exists is necessary. Because each application has a unique id, it is the best choice for singling out an application. Once that is confirmed to be true, each information element is checked. It is changed if needed. It is kept as is if no change is detected. Once this function is done, it will return the application by saving it with the new information.
The ability for changes to take effect from the frontend to the backend is an important piece of this function. In the controller class for the applications, the delete code looks like this:
@DeleteMapping("/applications/{id}")
    public String deleteApplication(@PathVariable("id") Long id) {
        applicationService.deleteApplicationById(id);
        return "Application has been deleted";
    }
“@DeleteMapping” is part of the REST API for the frontend. This is necessary for the backend to communicate with the frontend. It informs the frontend that this function is deleting something. The operation will take place at the following URL: “/applications/{id}”.
Frontend
On the frontend my dashboard class is the main class that other connect to. It handles most of the updates, charts and other data analysis. When the app is started, a function called loadApplication() which contains all of the loading for the individual components:
private loadApplications(): void {
    this.isLoading = true;
    this.error = undefined;

    this.applicationService.findAll().subscribe({
      next: (apps) => {
        this.applications = (apps ?? []).map(a => ({
          ...a,
          progress: this.computeProgress(a)
        }));
        this.appsByStatus = this.buildStatusChart(this.applications);
        this.appsByMonth  = this.buildLastTwoMonthsBarChart(this.applications);
        this.appsByYear = this.buildYearSubmissions(this.applications);
        this.hasMonthData = this.appsByMonth.some(d => d.value > 0);
        this.hasYearData = this.appsByYear.some(d => d.value > 0);
        this.isLoading = false;
      },
      error: (err) => {
        console.error('Failed to load applications', err);
        this.error = 'Failed to load applications';
        this.isLoading = false;
      }
    });
  }
The load function starts with declaring that loading is true as a default and errors are undefined. These are necessary to set states for each component so they can be shown appropriately. Next the progress bars are computed depending on the state of the application. This logic is located further down in the dashboard component. Next the charts data is loaded. All of the logic that the charts need is located in the dashboard component as well. This was an oversight at the time. I should’ve separated the logic for these into their own component. As far as this project is concerned, three charts is not a huge burden on the dashboard component. For readability and debugging, I would separate it next time.
Routing was something that gave me the most trouble. Initially I incorrectly had the dashboard component as the main entry point, not app.ts. This created problems where I couldn’t correctly call the adding applications page. Once I realized that it was a project breaking bug, I needed to fix it. I had to correct each route and path that I created. Once that was finished, I had an app.routing.module class that correctly pathed and routed everything:
const routes: Routes = [
  { path: 'dashboard', component: Dashboard },
  { path: 'add-application', component: AddApplication },
  { path: 'edit-application/:id', component: EditApplication },
  { path: '', redirectTo: '/dashboard', pathMatch: 'full' },
  { path: '**', redirectTo: '/dashboard' }
];
Here you can see how the dashboard is loaded as the main page and adding/editing applications have their own page.
Database (MySQL)
The database is one table named “Applications”. There is 7 columns that define the application. Typical ones like “id”, “job_title”, and “company” are defined. I also created a column for when the application was added to the database. There is another column for if or when the application is edited. The only column that has anything relating to relationship declaration is the “id” column. This property is the primary key but because it is the only table, it isn’t strictly necessary. Here is a view of the data in the database:

Last Modified:

Leave a comment